Pages

May 31, 2012

Did you know?

A short while ago Norden Crafts asked shop owners and designers who were interested, to sign up for a new program they were starting.  Little House was chosen as the first designer to start things off and "In Stitches" in Alexandria, VA was the first shop selected.

You can see what they put together HERE.

And as a thank-you to all of the loyal followers of LHN and the ornament series we are offering you a complimentary design to stitch.  Follow the link above to get your chart!

Happy Stitching,
Diane

Rose Hill Plantation - Copyright 2010
See the LHN web site under Inns and Plantations for more information!

May 30, 2012

Plant a Garden With Thread!

Oh how I wish we could have a garden!  A good friend of mine is busy planting hers in a state far away where the soil is rich and the conditions perfect for seeds and new plants.  As for me, gardens need to stay on blog backgrounds (see the new wallpaper?) and on linen!

Fresh Watermelon

Fresh from the Garden

If you are like me and can't plant a garden, or simply don't have a green thumb, take a peek at these LHN designs and see if there is one here that takes the place of a real garden!

Garden Pleasures

Gourmet Garden


Stay Cool and Happy Stitching,
Diane

May 21, 2012

Changing Colors

I can't tell you how many times I have seen one of my designs done in different colors and I've said "I wish I had thought of that."  It's true.  In the moment when I'm designing I have a "vision" for the design.  That vision is an expression of my likes and the things I surround myself in my personal life.  

Designing is very personal but so is stitching.  I have heard people pass over a design because it isn't in their colors, saying if only it were in red, blue, yellow. . . . . . . 

Let me show you just how easy it really is to go from my vision to your own.  Let's start with "Home of a Needleworker (too!)."  The design has a red, white and blue color-way.


The dominant color is blue and if your home is void of blue, this could be a problem.  The dilemma most people have with color changing is that they simply cannot get a vision for the design any other way other than the way it was originally stitched.  So how do you even begin to make changes?

First, ask yourself what color you would like to see in the design and pull it from your stash.  Next, using the cover of the pattern as the work space, lay it on top of the color you'd like to replace.  You can blur your eyes a little, squint . . . . but what you are looking for is a general idea of what the design my look like stitched in "your" color.  You don't have to replace every color, maybe just the dominant one(s).  And if in doubt just choose neutrals or those colors found in nature like browns and greens.


The four examples I've shown above have had a minimal amount of change yet they look very different from the original.  After you decide on the main color, go ahead and pull the rest of the threads listed on the pattern and lay them on the fabric.  Look for contrast with the background and color harmony.  

The pattern I chose to illustrate changes in is an easy one to work with.  Granted, many patterns are very complex and take designers hours if not days to complete color choices.  But when it's an easy one like this pattern, you can do it with relative ease and have fun in the process.

Happy Stitching,
Diane


May 16, 2012

Ding Dong

The actual name of the ornament this month is "Ding Dong Merrily on High."  And thank goodness I have Vonna doing the finishing again!  She is so creative.  I just love what she did with this one.


It is mounted on foam core and trimmed with twisted thread on the sides with a bow at the top.  All three designs will ship on Friday this week.  It won't be long now!  I hope to have the LHN web site updated that day too.

The temperature in Tucson is HOT.  It doesn't matter if it is 100 or 105.  There comes a point when it pretty much all feels the same.    

We just did some dog-sitting for Nikki while she and the family were away at Juliet's last dance competition of the season.  I caught a sweet picture of Luke and our grandson Andrew that I want to share.


It was so hot on Sunday.  Andrew stripped down to his diaper and played in the pool we had set up for Luke and Gracie.  It was clean water. . . . . I promise.  :)  The dogs were in it the day before, the water changed and then they went in after he left.


When Luke gets in he just lays in the water.  Gracie tip-toes around in it, gets a drink and gets out.

So that's all for now. . . . . thank you all for the wonderful comments on the new patterns, here and on Facebook.  

Happy Stitching,
Diane

May 15, 2012

Little House on a Hill

"Hill House" is the second pattern preview for the month May.  It's a cute little pattern that I hope you like.  I love that the name of our company is in the design itself!  The ornament is the last preview and it's coming soon!


Happy Stitching,
Diane

May 10, 2012

Two Yellow Houses

First of all. . . . . a while ago I wondered to myself what the Elizabeth Hancock Reproduction would look like if all of the main body were omitted.  The header shows you what that would look like.  It still looks great.  So for those of you who don't like stitching words, this is an option for you.

Two Yellow Houses is one of three designs we ship this month.  If yellow isn't your color you can easily swap out the two shades in the house for something that you do like.  Browns would look great too!  More photos will follow in the days ahead.


Happy Stitching,
Diane

May 8, 2012

Preview in the header!

You aren't seeing the entire design.  It has been cut off and filled in with words.  The design is called "Two Yellow Houses" and goes along with the other three we already have in our pattern line.  They are Two White, Blue and Red Houses.

I'll show you the entire design real soon!

Happy Stitching,
Diane
P.S.  This design ships to our distributors the middle of this month.

An early evening walk . . . . .

Ron, Gracie and I took an early evening walk last night and encountered the sweetest little birds.  


The desert is blooming.  


I take my camera most places. . . . . it's usually hanging from my neck like a piece of jewelry.  You just never know when life will present a beautiful moment.


Happy stitching,
Diane

May 4, 2012

The weekend is here. . . . .


I'll be showing you May's new designs next week!
Diane

May 2, 2012

Running out of wall space????

If you are one of the many who have run out of wall space but are not handy with a sewing machine to finish projects, I have something for you.  You'll have to be brave though. . . . . it involves, Mod Podge, a glue gun and scissors. . . . . . .the first two being real no-no's in the needlework industry.

I started with a paper mache book box from the craft store.  A box with a lid would work too.  The "page" portion of the box was painted with a gold metallic using a sponge brush.


It's nice and shiny.  :)


Measure and cut a piece of fabric that will completely cover the outside of the book.  With the RIGHT side of the fabric up, coat with Mod Podge.  I used a sponge brush for this step too.  Allow to dry completely.


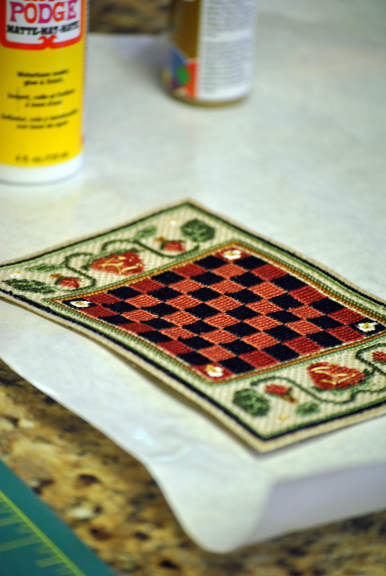
Trim much of the excess fabric away from the design you plan to mount.  Coat the EXCESS edge on the back side of the design, not the design itself.  You are doing this to stop any fraying and stabilize the fabric.   This is the strawberry gameboard (http://www.littlehouseneedleworks.com/garden.html).


Once this piece dries, trim closely to the last stitches.  I left about 1/8".  The Mod Podge allowed the fabric to stiffen and there was no raveling.  This is scary stuff!!!  Cutting. . . . gluing. . . . . . eek!


Next, measure the width and length of the book.  I used a ruler and rotary cutter to trim the fabric to fit, allowing for 1/4" turns to the inside.  So whatever your measurements are, add 1/2" to each measurement.


Next step, coat the outside of the box with Mod Podge and go to work centering and pressing the fabric.  Once it's in place, sponge more Mod Podge onto the inside areas.  Don't worry about perfectionism.  The product dries clear.  It takes a while to get it all to stick.  I continued dabbing my fingers into a puddle of the MP to get it all to lay down but it did.  After the glue dried I antiqued the pages a bit with black paint and rubbed a bit of the gold in dry-brush fashion over the fabric.  I forgot to photograph that step.  Oops.


Now it's time to take your stitched piece and adhere it to the book.  Again using Mod Podge, brush the edges a bit heavily but the inside of the design lightly.  Center on the box and press.  The MP dries rather quickly so move along with determination!


This is the last step.  It includes a glue gun, probably the scariest part.  Squeeze gently with a thin bead of really hot glue and trim the edge of the design with twine or other pliable trim.  I left a long tail and started at the center/top so I could tie a bow.  If the glue is hot it spreads nicely.  If you rush it blobs out.


So here it is finished.  Because this book stands, it's perfect for a bookcase.  I know there are other ways of finishing a project like this.  You could skip applying fabric and just paint the box or antique it.  The design could be mounted to foam core to make the center more dimensional.  Ahhhhh. . .  .then there is the inside.  Maybe we'll tackle that another day.

So many ideas. . . . so little time.


Happy Stitching,
 Diane